The character editor allows you to edit character resources (.dch). It has four sections.

📜 Content
1. Main Settings
The character resource has a number of settings:
1.1 General
-
Display Name: This string will be shown on the name label. Notably this can be a variable if you want the display name to change during the game. Just put the variable name in curly brackets.
-
Nicknames: These strings (comma separated) will also be considered for the
Autocolor namesoption (in the text settings). -
Description: Does nothing. Could help you remember what this character was for.
1.2 Portraits
-
Default Portrait: The portrait that will be used if none is specified (for Character event
Joinmode or text effect [portrait]). This does not affect Text events without a portrait specified! In that case, there will be no change. -
Portrait Settings: Scale, offset and mirror settings that will be applied to all portraits. Note that scale, offset and mirror can also be set individually per portrait.
1.3 Style
- Style: If you set a custom style, it will be used whenever this character is speaking. As this can result in rapid style changes, we suggest using the same layout for variations like this.
1.4 Typing Sounds
- Sound Moods: A sound mood is a folder of sounds, and a random one is played for each letter these characters say. You can have different sound moods for different portraits.
1.5 Text Prefix & Suffix
Applying specific text segments before and after a spoken text by the character allows you to add quotation marks or rich tags. If you issue the player multiple times to advance within a single Text Event, each message part will appear with Prefix and Suffix.
-
Prefix: Text that appears before character text via the Text Event.
-
Suffix: Text that appears after character text via the Text Event.
Custom tags do not make rich tags work automatically.

Your Dialogic Style is responsible to support Rich Tags in the Text Box.
By default, Dialogic's own Style Layers support Rich Tags in the Text Box.
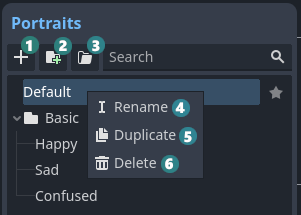
2. Portrait list
The portrait list allows you to add portraits to your character. A portrait is a scene that will be instanced and moved around by Dialogic when you use the Character event.
A character can have unlimited portraits, but each has to have a unique name.
- Add a new portrait
- Add a new portrait group
- Import a folder of images as portraits
- Rename a portrait or group (or double-click or use F2)
- Duplicate a portrait
- Delete a portrait or group (or Delete key)

Note: Groups are not actually saved. This means empty groups will get lost when leaving the editor.
3. Preview
The preview shows the selected portrait (or nothing, if you don’t have a portrait). You can switch between a Full view that will size the character so it’s fully visible and a Real size view that shows the character at full scale.
4. Portrait settings
The portrait section consists of multiple sections, each containing settings for the currently selected portrait.
The most important setting is the scene a portrait uses. The default scene allows you to select an image. However, you can also use the Layered Portrait scene.
Learn more about how to create a custom portrait here: Custom portraits
For any portrait, you can set a scale, offset and mirror setting. These are additive to the main scale, offset and mirror. You can choose to ignore the main character scale to work around this.
When you use a custom portrait, you can override its exported variables here.